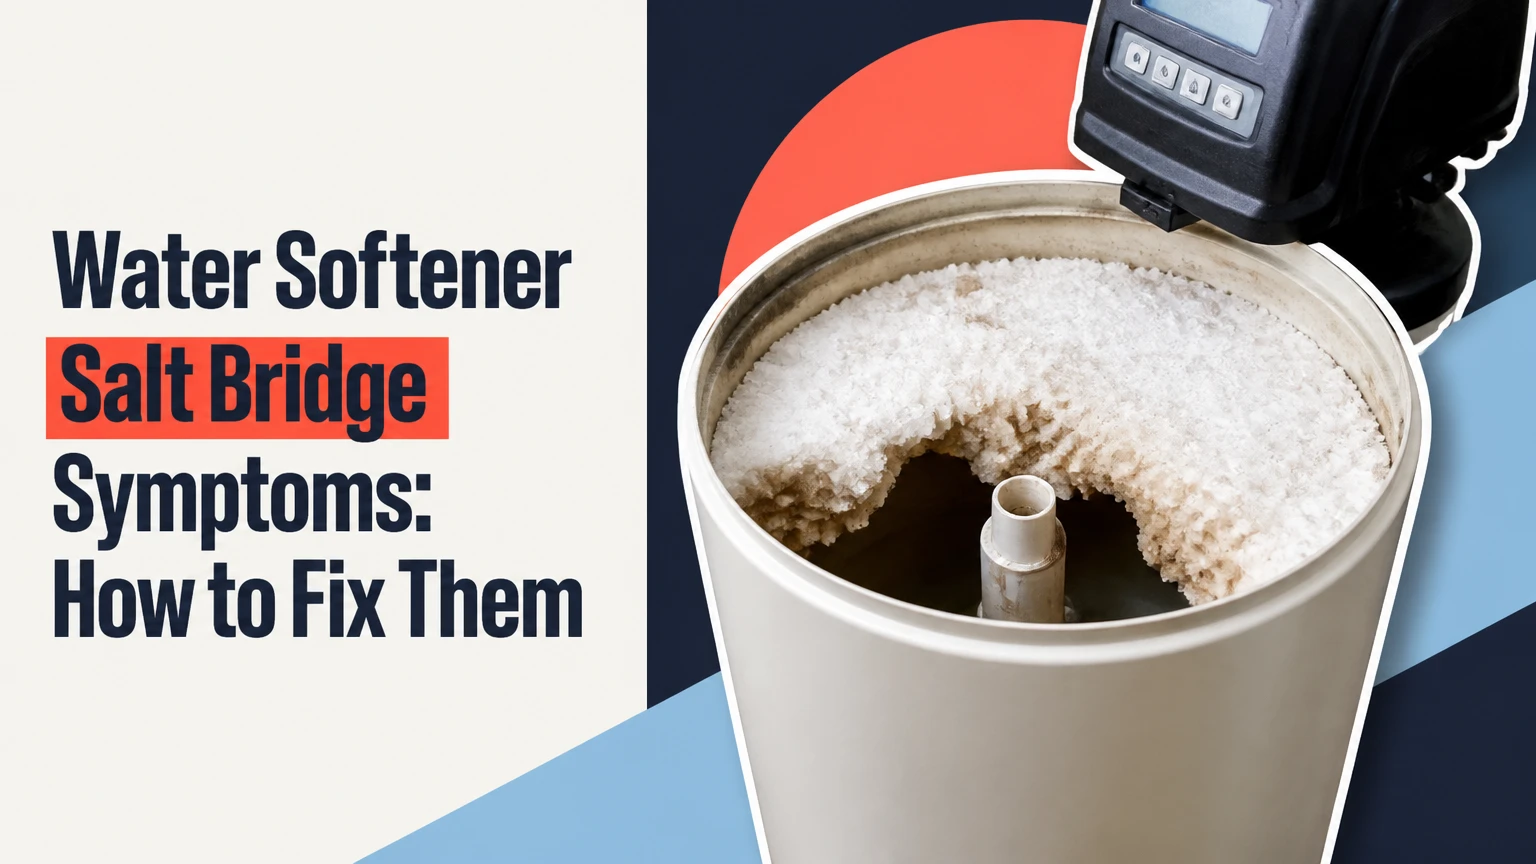
Water softener salt bridge symptoms include returning hard water, a salt level that does not fall, a hollow sound inside the brine tank, and a rigid crust over empty space. A salt bridge prevents water from dissolving salt, so the softener cannot produce brine and regenerate its resin. Most bridges can be removed safely in 10-20 minutes.
Key Facts at a Glance
- A salt bridge is a hardened layer of salt suspended above water in the brine tank.
- The most reliable sign is a solid crust with a hollow cavity beneath it, not simply a high salt level.
- Hard water can return because of a salt bridge, but bypass settings, low salt, clogged injectors, and exhausted resin can cause the same symptom.
- Use a long, blunt plastic or wooden tool; sharp tools can puncture the tank or damage the brine well.
- A manual regeneration cycle usually takes 60-120 minutes, depending on the control valve and programmed settings.
- Salt type, humidity, fill height, tank cleanliness, and brine-system condition all affect bridging risk.
What Is a Water Softener Salt Bridge?
A water softener salt bridge is a hardened crust of sodium chloride or potassium chloride formed across the brine tank, usually above the actual water level. The crust creates a hollow cavity, so the tank can look full while very little salt reaches the water.
A normal brine tank contains salt above a measured volume of water. During regeneration, the control valve draws the concentrated brine through the resin tank. A salt bridge interrupts that process because the lower salt supply cannot dissolve and the upper crust remains suspended.
The bridge is often strongest around the tank wall, where temperature changes and condensation affect salt first. The center may sound hollow, or the entire upper surface may feel like a rigid floor. A bridge can form in a tank that contains fresh pellets, old crystals, or potassium chloride.
Salt Bridge Versus Salt Mushing
A salt bridge is a hard upper crust with an air gap below it. Salt mushing is a dense, wet layer of undissolved salt settled on the tank bottom, often caused by impurities, excessive moisture, or compacted salt.
| Condition | Physical appearance | Typical location | Main effect |
|---|---|---|---|
| Salt bridge | Hard crust with hollow space | Upper or middle tank | Salt cannot contact brine water |
| Salt mushing | Wet, compacted sludge | Tank bottom | Blocks salt dissolution and pickup |
| Empty tank | No salt above water | Entire tank | No brine can be produced |
| Salt crust on surface | Thin fused layer | Top few centimeters | May reduce dissolution without stopping it |
The distinction matters because breaking an upper crust will not solve salt mushing. If the tank contains wet sludge after the bridge is removed, the brine tank needs cleaning rather than another refill.
How Can You Tell if a Salt Bridge Has Formed?
The strongest diagnosis combines a service symptom with a physical inspection. Returning hard water plus unchanged salt consumption is more meaningful than either sign alone, because a softener can retain salt for other reasons.
Returning Hard Water
Hard water often returns when a bridge prevents regeneration. Common household signs include reduced soap lather, mineral spots on glassware, stiff laundry, dry-feeling skin, and white calcium carbonate deposits around faucets.
Hard water is not proof of a bridge. A softener in bypass, an incorrect hardness setting, a clogged injector, a failed brine valve, a blocked drain line, or depleted resin can produce the same result. Treat the water symptom as a reason to inspect the brine tank, not as a complete diagnosis.
Salt Level Never Drops
A salt level that remains unchanged for two or more scheduled regenerations indicates that the softener is not consuming salt normally. A bridge is likely when the visible salt is firm and the unit has recently been using water.
Mark the salt surface with a pencil on the outside of the tank or photograph it from the same angle. Do not judge only by looking down, because a bridge can hide an empty cavity beneath a stable top layer.
Hollow Sound and Hard Crust
Tap the tank gently with a wooden broom handle at several heights. A dull, solid sound suggests salt is contacting the tank wall, while a hollow sound suggests an air cavity. Sound alone is not conclusive because tank shape, insulation, and salt density alter the result.
Open the brine-tank lid and press a blunt tool vertically into the salt. A bridge produces firm resistance followed by a sudden drop when the tool breaks through. Stop if the tool contacts the brine well, float assembly, or tank floor.
| Observation | Bridge likelihood | What to check next |
|---|---|---|
| Hard water plus unchanged salt | High | Probe the salt crust safely |
| Salt surface falls after probing | High | Remove loose chunks and regenerate |
| Salt is wet at the bottom | Medium | Check for mushing and tank cleaning |
| Tank is full of water | Low as a sole sign | Inspect float, drain, injector, and valve |
| Salt level falls normally but water is hard | Low | Test bypass, settings, resin, and regeneration |
Why Do Salt Bridges Form?
Salt bridges form when moisture partially dissolves salt and later allows the crystals to fuse into a rigid mass. High humidity, temperature changes, condensation, overfilling, salt dust, and prolonged storage increase the chance that a stable crust will develop.
Salt is hygroscopic, meaning it attracts and absorbs moisture from surrounding air. A humid basement or warm garage can repeatedly wet the upper salt layer. When the surface dries, dissolved salt recrystallizes and binds nearby pellets or crystals into a shell.
The tank’s operating pattern also matters. A softener used by a small household may leave salt in place for months, giving moisture more time to create a bridge. A heavily used unit can bridge when the tank is overfilled, because a tall salt column adds weight and traps damp air.
Environmental and Operating Causes
| Cause | Typical condition | How it promotes bridging | Practical correction |
|---|---|---|---|
| High humidity | Damp basement or garage | Moisture binds surface salt | Improve ventilation or use a dehumidifier |
| Heat cycles | Tank near furnace or water heater | Condensation and drying repeat | Move the tank away from heat |
| Overfilling | Salt above the recommended line | Adds weight and moisture retention | Add smaller quantities |
| Long storage | Salt remains for 2-6 months | Crystals fuse over time | Check the tank monthly |
| Mixed products | Pellets over crystals | Different shapes trap voids | Use one salt type consistently |
| Salt impurities | Rock salt or dirty crystals | Sediment encourages mushing | Use water-softener-grade salt |
An important practitioner rule is that salt purity reduces residue but does not eliminate bridges. Even high-purity evaporated pellets can harden when a tank is full, humid, or rarely used.
Which Salt Has the Lowest Bridging Risk?
High-purity evaporated pellets generally have the lowest practical bridging risk for residential systems, but operating conditions matter more than a product label alone. Solar crystals can work well in dry locations, while rock salt usually leaves more sediment and creates greater maintenance risk.
Use only salt labeled for water softeners. The manufacturer’s manual takes priority when it specifies pellet size, purity, or potassium chloride compatibility.
| Salt product | Typical purity or form | Bridging tendency | Best operating situation |
|---|---|---|---|
| Evaporated pellets | About 99.5%-99.9% sodium chloride | Low to moderate | Standard residential softeners |
| Solar crystals | Sun-evaporated crystalline salt | Moderate | Dry, regularly used installations |
| Rock salt | Mined crystals with more insoluble matter | High | Generally poor choice for softeners |
| Potassium chloride | Alternative regenerant | Moderate to high | Sodium-reduction requirements |
| Salt blocks | Compressed large pieces | Model-dependent | Only when the manual approves them |
Potassium chloride is not automatically a salt-bridge solution. Potassium chloride can absorb moisture and form hard masses, and some control valves require a different dosage or setting. Users choosing it for sodium reduction should follow the softener manufacturer’s instructions and monitor tank condition more often.
How Do You Remove a Water Softener Salt Bridge?
Remove a salt bridge by placing the softener in bypass, gently breaking the crust with a blunt tool, removing large pieces, and running a correctly programmed regeneration. A typical DIY repair takes 10-20 minutes, but cleaning wet salt or diagnosing a valve can extend the job to one or two hours.
Before You Start
| Requirement | Typical value | Notes |
|---|---|---|
| Labor time | 10-20 minutes | Excludes full tank cleaning |
| Regeneration time | 60-120 minutes | Depends on valve programming |
| DIY cost | $0-$15 | Household tool or replacement scoop |
| Professional service | Typically $75-$200 | Local rates and diagnosis vary |
| Tools | 1 blunt tool, 1 bucket, gloves | Avoid sharp metal tools |
| Prerequisite | Softener manual available | Confirms bypass and regeneration controls |
Step 1: Put the Softener in Bypass
Turn the bypass handle or valve to the manufacturer’s bypass position. This prevents untreated or disturbed brine from entering household plumbing during inspection.
If the unit has no obvious bypass, close the home water supply only when the manual identifies the correct procedure. Do not disconnect control-valve plumbing while the system is pressurized.
You will know this step worked when the bypass indicator matches the manual and water flow through the softener stops. A common mistake is turning the wrong valve and accidentally restricting water to the house.
Step 2: Inspect the Tank Surface
Remove the brine-tank lid and look for a continuous crust, cracks, or a visible cavity. Check whether the salt surface is dry, wet, or unusually high against the tank walls.
Keep hands away from the float assembly and brine well. The narrow vertical tube or covered cylinder inside many tanks contains the float and brine components, which can be damaged by force.
Step 3: Break the Crust With a Blunt Tool
Use a wooden broom handle or a long, blunt plastic rod. Press vertically into the center of the crust with controlled force, then work outward in several locations.
Do not use a screwdriver, crowbar, knife, garden shear, or metal rod. A punctured polyethylene tank can leak, and damage to the brine well may prevent proper refill or brine draw.
You will know the bridge has opened when the tool drops through the crust and loose salt collapses into the water. Stop pushing at the tank bottom.
Step 4: Remove Large Chunks
Break oversized pieces into smaller fragments and scoop out pieces that cannot dissolve readily. A plastic scoop or small bucket works better than a metal shovel inside a narrow tank.
Do not remove every dry pellet if the salt is clean and loose. Remove wet sludge, discolored material, dirt, and chunks larger than a few centimeters, because those materials can obstruct the salt platform or encourage mushing.
Step 5: Check Water and Brine Components
Look at the water level and the exposed brine-well area without moving the float. A small amount of water beneath the salt is normal, while an unusually high level, no visible water, or a damaged float requires further diagnosis.
A tank full of water is not a normal consequence of every bridge. It can indicate a blocked drain, stuck float, failed brine valve, injector obstruction, or control-valve problem.
Step 6: Exit Bypass and Regenerate
Return the valve to service only after the salt crust is open and large debris is removed. Start a manual regeneration according to the control head’s instructions.
Do not guess the regeneration sequence on a metered valve. Some systems require holding a regeneration button, while others use a dial or electronic menu. The cycle commonly lasts 60-120 minutes.
You will know the repair worked when the system completes brine draw, the salt surface changes during later use, and a hardness test shows reduced mineral hardness. The first water after service may require a brief flush if the manufacturer advises it.
What Should You Check if the Bridge Returns?
A recurring salt bridge usually indicates persistent moisture, excessive salt storage, poor salt quality, or a brine-system fault. Remove the bridge once, then investigate the cause instead of repeatedly adding salt and breaking the crust.
| Recurrence pattern | Most likely cause | Diagnostic action | Corrective action |
|---|---|---|---|
| Bridge returns within weeks | High humidity or heat | Measure room humidity and inspect condensation | Relocate tank or reduce moisture |
| Salt remains for months | Low water use or overfilling | Compare household use with salt dose | Add smaller loads |
| Tank water stays high | Float, valve, or drain fault | Observe brine draw and drain flow | Service the brine system |
| Salt disappears but water stays hard | Setting or resin problem | Test hardness before and after regeneration | Correct settings or inspect resin |
| Wet sludge accumulates | Impurities or poor dissolution | Scoop bottom material for inspection | Clean tank and use purer salt |
Check the Brine Draw
During the brine-draw stage, the water level should normally fall as concentrated brine moves toward the resin tank. Exact levels vary by system, so use the manufacturer’s manual rather than a universal inch measurement.
A blocked injector, clogged screen, kinked drain line, or inadequate water pressure can prevent brine draw. The softener may appear to regenerate while the resin receives little or no brine.
Check Hardness and Programming
Measure raw and treated water hardness with a hardness test kit or laboratory test. Compare the result with the control valve’s hardness setting, iron compensation, capacity, and regeneration frequency.
An incorrect hardness value can cause inefficient salt use or insufficient treatment. On private wells, iron and manganese can also consume softening capacity, so a setting based only on calcium hardness may understate the required capacity.
What Are the Most Common False Diagnoses?
A salt bridge is frequently blamed for hard water that actually results from bypass operation, a programming error, or a failed brine-draw system. Physical inspection prevents unnecessary tank cleaning and helps identify repairs that require a technician.
- The softener is in bypass: The resin receives no treated flow even if the brine tank looks normal.
- The salt tank is empty: An empty tank has no crust or air cavity and needs the correct salt refill.
- The salt is mushing: Wet material at the bottom requires cleaning, not merely surface probing.
- The resin is exhausted: Old or chemically damaged resin may not soften water after successful regeneration.
- The control valve is malfunctioning: A motor, piston, seal, or sensor failure can interrupt regeneration.
- The hardness setting is wrong: The unit may regenerate too late for the actual mineral load.
A counterintuitive field observation is that a completely unchanged salt level does not always mean a bridge. A unit with a failed meter, disabled regeneration schedule, or stuck valve can also consume no salt. Confirm that a regeneration command actually starts before treating the tank as the only fault.
How Much Does Salt Bridge Repair Cost?
DIY salt-bridge removal typically costs $0-$15 and takes 10-20 minutes. A professional visit commonly costs about $75-$200 for inspection and basic service in many United States markets, while tank cleaning, valve repair, or resin replacement can cost substantially more.
| Service or remedy | Typical cost | Typical time | When it applies |
|---|---|---|---|
| DIY bridge removal | $0-$15 | 10-20 minutes | Clean, accessible surface crust |
| Technician diagnosis | $75-$200 | 30-90 minutes | Uncertain cause or failed regeneration |
| Brine tank cleaning | $150-$350 | 1-3 hours | Mushing, dirt, or heavy residue |
| Injector or screen service | $100-$300 | 30-90 minutes | No brine draw or restricted flow |
| Resin replacement | $300-$900 | 2-5 hours | Exhausted or damaged resin bed |
Costs vary by region, equipment size, travel fees, and brand. The Bangladeshi taka figures sometimes published online are not transferable to other markets, so a local quote is more reliable than a universal price list.
How Do You Prevent Future Salt Bridges?
Prevent future bridges by using approved high-purity salt, keeping the tank away from heat and moisture, adding smaller quantities, and checking salt movement monthly. The correct maximum fill level comes from the manufacturer, not a universal half-full rule.
Many residential systems operate well when salt is kept several inches below the tank rim, but tank geometry and control design differ. Filling a tank halfway can be reasonable maintenance practice, yet it is not a substitute for the manual’s fill instructions.
Practical Maintenance Schedule
| Task | Typical interval | Acceptance check | Action if it fails |
|---|---|---|---|
| Inspect salt surface | Monthly | Surface is loose, not crusted | Probe carefully and remove bridge |
| Check salt consumption | Every 1-2 months | Level falls after regeneration | Inspect meter and valve if unchanged |
| Inspect water level | Monthly | Level matches manual guidance | Check float and brine draw |
| Clean brine tank | Every 6-12 months as needed | No sludge or heavy sediment | Remove salt and wash tank |
| Test treated hardness | Every 6-12 months | Result meets household target | Adjust settings or service unit |
Store bags of salt off the floor and sealed from damp air. Do not pour new product onto a thick, old layer without checking for a crust below the surface.
Scenario Guidance
Humid basement: Reduce the amount added at one time, improve airflow, and keep the lid properly fitted. A dehumidifier can help when room humidity remains high, but it will not correct a leaking valve.
Low-use vacation home: A long interval between regenerations makes bridging more likely. Inspect the tank before reopening the water supply and follow the manufacturer’s vacation setting.
Potassium chloride user: Confirm compatibility, use the programmed dosage recommended for potassium chloride, and inspect the tank more frequently because moisture-related clumping remains possible.
Well-water system: Test iron and manganese, verify adequate pressure, and inspect the injector and drain line. Iron fouling can mimic a salt bridge by reducing softening performance.
When Should You Call a Technician?
Call a technician when the brine tank remains full of water, regeneration does not start, the unit leaks, the tank or brine well is damaged, or hard water persists after a confirmed regeneration. Electrical controls and pressurized plumbing should not be disassembled without the model’s service instructions.
A technician is also appropriate when salt bridges recur after environmental corrections and proper tank cleaning. Repeated bridging can be a symptom of abnormal water level, poor brine refill control, or an incorrectly sized softener.
A salt bridge is not a reason to replace the entire softener by itself. Replacement becomes more reasonable when the resin is exhausted, the control valve is obsolete, the tank leaks, or repeated repairs approach the cost of a properly sized replacement.
Salt-Based Softeners Versus Salt-Free Conditioners
Salt-based water softeners remove calcium and magnesium through ion exchange, while salt-free conditioners generally alter scale behavior without removing hardness minerals. A salt-free device therefore does not provide the same soft-water result, even if it reduces some scale under suitable water conditions.
| System type | Removes calcium and magnesium | Uses regenerant | Typical maintenance | Best fit |
|---|---|---|---|---|
| Ion-exchange softener | Yes | Sodium or potassium chloride | Salt and brine-tank service | Actual hardness reduction |
| Salt-free conditioner | No | None | Media replacement or inspection | Scale control without softening |
| Reverse osmosis faucet system | Yes, at one tap | Filter replacements | Filter service | Drinking-water treatment |
| Polyphosphate feeder | No | Chemical media | Media replenishment | Limited scale-control applications |
The choice depends on the goal. If the household needs lower hardness for laundry, bathing, or whole-house plumbing, a properly sized ion-exchange softener is the relevant technology. If the goal is only point-of-use drinking-water treatment, reverse osmosis may address that narrower need.
Frequently Asked Questions
Can a salt bridge damage a water softener?
A salt bridge usually does not damage the resin tank or control valve directly, but prolonged failure to regenerate can leave the resin exhausted and allow scale to accumulate. Forceful removal can cause more immediate damage if a sharp tool punctures the brine tank or breaks the float assembly.
Can I pour hot water into the brine tank?
Avoid boiling or very hot water because heat can deform plastic parts and may disturb the brine system. If the manufacturer permits warm water for a specific model, use only the stated temperature and quantity. Mechanical removal with a blunt tool is usually safer for a dry crust.
Why is my softener using salt but still producing hard water?
Salt consumption does not prove that regeneration is effective. The unit may have inadequate brine draw, a blocked injector, an incorrect hardness setting, exhausted resin, a bypass leak, or a control-valve failure. Test treated hardness after a complete regeneration and inspect the brine-draw stage.
How often should I add salt?
Add salt when the level approaches the manufacturer’s minimum operating mark, often several inches above the water or salt platform. Monthly inspection is a practical baseline, but household water use, hardness, tank capacity, and programmed salt dose determine the actual interval.
Is a salt bridge dangerous to household health?
A salt bridge is mainly an equipment-performance problem, not usually a direct health hazard. The larger concern is untreated hard water, which can cause scale and reduce cleaning performance. Follow local drinking-water guidance if sodium or potassium intake is a concern, and use appropriate point-of-use treatment when advised.
How can I confirm that the repair worked?
Confirm success by checking that the regeneration cycle completes, the brine level changes during brine draw, the salt surface begins falling after normal use, and a hardness test shows the expected reduction. If any one check fails, investigate the valve, injector, settings, bypass, or resin rather than breaking the salt again.
The Bottom Line
The most recognizable water softener salt bridge symptoms are returning hard water, an unchanged salt level, a hollow tank sound, and a rigid crust that gives way into an empty cavity. Put the unit in bypass, break the crust with a blunt tool, remove large or wet pieces, and run a model-appropriate regeneration cycle. If hard water continues or the bridge returns quickly, inspect the brine system, settings, humidity, and resin rather than assuming the salt itself is the only problem.